Wednesday, December 26, 2012

Crafting is Contagious!


My Roommate crafted!
I am SO proud of her! 

We went to goodwill, looking for a fun project to do and found something similar to this: 


It's meant as a coffe mug holder, but I thought we could repurpose it as a jewelry stand. 

We got home and Sara did all the painting herself. I may have helped a tiny bit with the color mixing, but this project was really all her.


She wanted grey and blue, so using painters tape she got clean lines (no mess ups!) 


finished product!


Such a great example of how you can repurpose almost anything! Just a little bit of imagination, and paint - and you've got yourself a new jewelry stand!

That's all folks!

Sunday, December 23, 2012

Rays of Sunshine


It's a magazine wreath!


I had a giant (and I mean GIANT) stack of magazines around and I needed to throw them away, but because there were so many I felt kind of guilty, and wanted to do something useful with them. I googled and pinterested around for good magazine crafts and found some possibilities...magazine trivet, mag garbage can, mag picture frames....but nothing struck my fancy 

Then I happened upon this!

I found this here. and fell in love. Unfortunately after scouring the Internet, I couldn't find any how-to's, so I kind of had to wing it. I also knew I wanted something a little different because I really wanted to mirror in the middle. 

Start with a magazine you don't want or need anymore and rip the pages out. I went through and tried to rip out pages with compelling colors and not a lot of text. 

When you find your page, turn it over, and put glue in the far corner (away from where you ripped it out of the magazine) 


Then start rolling! It's easier if you use both hands, so everything stays even throughout the rolling. 


Now make a million of those! When you think you are done,  you aren't. You will need more I guarantee it. 

Once I finished that, I headed over to Michael's to get a wreath frame and a mirror, but as I linked, you can get this stuff on amazon. Just make sure they are similar in size, the Mirror being slightly bigger than wreath frame.


Then start tucking your rolls into the frame, going under and over. 


After i finished the whole circle i secured it with a glue gun.
Then I glued the mirror to a piece of cardboard that I took off a shoe box and cut to size. and glued that to the frame. I just used tooons of glue and even after I was done kept spot gluing it to make it as secure as possible


Then I hung it on my wall :) as the center piece above our table in the kitchen


That's all folks!  

Saturday, December 22, 2012

Playing with Paint


Recently I did a craft that required me to disassemble this clock: 


(don't worry that craft will be up soon! Let me assure you it was super cool) I was left with the silver ring/frame and the 2 hard plastic pieces:


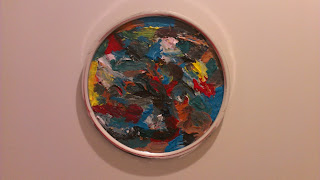
I was all ready to throw them out, but I felt like it was a shame to waste a perfect circle that pretty much came with a frame. I was thinking of using cool scrapbook paper and maybe going for a picture frame look, but after having a tough week realized I needed to paint! I just started putting paint on paper and mixing crazy colors. I wasn't looking to create any real colors as much as I was looking to make a texture, so you could see the different colors I was combining.


Using about 15 different paint brushes I just started brushing the paints onto the circle, figuring if it ended up looking ridiculous I would throw it out. 


repeat...


until I ended up with this! 


This was so easy, and really required no skills...I just painted until I felt like it looked cool (don't tell any of my art teachers I said that!)

I did the same thing with the other one, and next to each other they look like this:


I just hot glued around the ring and and placed the plastic circle in 


and voila! 


Got the OK from the roomates, and hung them in the little hallway we have adding a little more character around here :) 


Moral of the story, painting is fun and therapeutic, and ends in something new to hang on the wall! 

That's all folks! 


Monday, December 17, 2012

inspire


Inspiration is everything.

As a crafter, designer and event planner, every idea starts with that tiny spark of inspiration. That feeling in your gut that u can do it, which rises into an image in your head of exactly how awesome whatever you are going to do its going to be. I always get a sense of urgency, my pulse quickening my lips forming into an excited grin, for those that live with me sometimes a shriek of excitement is even involved, and if I really think its going to be cool, I might even jump around.


That being said, it can sometimes feel hard to get that flash, or feel motivated to get up and get supplies, or start on something you aren't sure you will be able to pull off. I try to surround myself with things that make me happy and keep me inspired.

I came upon this awesome website called busy building things, through lifehacker, They are motivational prints for supa cheap! 


$20 for a print, and $40 to get it with a frame! They are all really well designed and would look good on any wall. Belated Chanuka gift anyone?


Another cool way to go about it is a dream board of sorts. 


I got the cool paperclip thing here. As you can see I use it for inspiration - pictures of my nieces, my most recent card design and some flourishes. It's also pretty great for things I need on hand - the stamps and gym schedule. Plus...it looks cool which is always a plus! 


How do you stay inspired and motivated? 

That's all folks! 


Wednesday, December 12, 2012

Flower Power


When I moved into my apartment, I had a big space above my bed that was perfect for a sort of show piece. I was waiting until i happened upon something that caught my eye, but I couldn't really find anything that i liked or that matched my room. 


Right before my lovely roommate moved in I did a search on her Etsy page and had some major jealousy!! She does awesome crayon art and I just HAD to try it. 

Supplies: 
  • Crayons - I used Crayola and stuck to greens yellows and browns, which makes sense as the stems, but if you are going to make something else get different colors (RAINBOW!!)
  • Foam board - mine it 20x30
  • Flowers - I got fake Gerber daisies because they are my favorite but any fake flowers are just fine. (Mine are from Michaels) 


I wanted the flowers to match my bed spread, which is why I got the yellow red and purple! 

Using a glue gun I glued the crayons into a line in a random pattern. I started off using a ruler to keep it straight but that got super annoying, so I just eyeballed it. The crayons started to get a little crooked so I had to keep making sure to stop and make sure it was still straight. I know hot glue dries fast, but it also peels off really easily so it's ok if you  need to do it more than once! 


And Voila! Crayons in a row! 

Held up with the crayons on tops, you are really supposed to use a heat gun but I didn't have one, so I used a blow dryer. Careful! You WILL get crayon everywhere (If you get it on the floor, heat it with the blow dryer and wipe while its still wet!)

After it dries (I let it sit over night) glue the flowers on!

First just place them to make sure the won't look stupid


then when you realize the first way was in fact stupid looking, readjust :)


fame it, hang it, and admire it!


that's all folks! 


Tuesday, December 11, 2012

E is for Elana


My business The Main Events planned a Shalom Bat for my beautiful niece Elana. I have a bunch of cool crafts to post from that party, but I'm going to post my favorite and most last minute project first.

I was looking for something to do on the outside, to sort of bring people into the party and make sure people were already smiling even before they walked in.

After google-ing around, and checking my favorite resource  Pinterest i found this balloon wreath and thought it was incredibly cool and unique. In a burst of inspiration I ran to Michaels to get a foam wreath, which was suggested in the DIY post I found. Surrounded by all the Styrofoam I decided I wanted to make a giant E! It ended up looking like this:


The supplies were as follows: 

  • Balloons - like seriously a lot of them. I must have used 200 at least
  • Styrofoam - I used 5 rectangular pieces, if you want to make a circular one you will need the wreath shaped one. 
  • Pipe cleaners (get fun colors!)
  • Greening Pins - these are located in the gardening section. I got 3 boxes


Using a glue gun  a put the Styrofoam together to make an "E". I gave it a few minutes to dry, but since hot glue dries incredibly fast there wasn't really a wait time.

Unfortunately I don't have a picture of the actual fastening, but I grabbed a bunch of balloons together and attached them to the E by sticking the greening pins in. I did it pretty randomly  and just tried to make sure I didn't have too many of the same color near each other.


 The hardest part was making sure you couldn't see any of the white from any angle since I knew it would hang on the door, but all together it was a pretty simple project and added a lot to the event.

Last put not least I twisted pipe-cleaners around a pencil to make them squiggly


then pull!


I made a bunch of these and just stuck them all around the E


and that's all folks!


Welcome!


So these days I have been crafting like a crazy person.

I'd like to share my crafts with you!

Enjoy, and craft with me - its so much fun! Feel free to ask any questions, and please try everything at home. If I can do it you definitely can.

Love,
Rivie